Here is my submission document for the table. If you have kept track of the blog there may not be anything new. But it does wrap it up nicely.
With this project out of the way, I will now finish the crib. Promise.
Check out the other entries here

Showing posts with label Sawdust Chronicles Challenge 2010. Show all posts
Showing posts with label Sawdust Chronicles Challenge 2010. Show all posts
Tuesday, November 2, 2010

Wednesday, October 27, 2010
Sawdust Chronicles Challenge 2010 Part 12 (Not that table)
Amber and I just moved the table to it's home in our house, and I want to take this opportunity to do a really quick summary of how this table's form came to be. When Amber and I first talked about making a table for this challenge. She clearly defined a table to me. As it turned out, she was sitting at the very table she was describing.


Well I while the table I created shares some elements with the table described, it is missing some key features. 1. It does not have a drawer. That got tossed out early in the design process. 1, because I was doing two projects at once, and 2 because I was doing 2 projects at once, and would like to finish them both within a reasonable time. Did I mention that I was doing to projects at once??
Well from that discussion, I came up with this design.

This is not a bad design. But it was still too much like table #1 up there, and I wanted to stretch a little more. So I came up with this design.

For the most part, this is the table I made. After printing full-scale drawings, and making some of the stretchers and rails I refined some of the curves, and dimensions. I also decided to soften the edges of the rails, while leaving the legs with a hard edge. Mainly I did this for the shadows that it casts, but it also feels better on the legs if you bump into the rails. The other change during construction was the rounding of the tops of the legs.

While it is hard to see in this picture, the legs are not chamfered at a 45. That is how the cut started. I rounded the bottom edge with a chair rasp to ease the line.

The legs where then tapered by 1 degree from the bottom of the mortise to the bottom of the leg. In the photographs it makes little difference, but when viewing the table, it helps to continue the curve from the rail to the floor.
All that aside, I am happy with how it turned out. Here is the table in it's new home, while it is not being used as a game table.


(My wife added the coaster feet... It should help to move the table around. It really is heavier than it looks with that oak top.)
Sawdust Chronicles Challenge 2010 Part11
Done... I put the last coat of finish on the table early this morning, and it is dry enough tonight to bring into the house. As a whole, it has some things that I would probably change a little if I had to do it again. But for what it is, I think it is pretty good. It is certainly good enough for what we will use it for.
Here are a few shots of the table in our house. Where the pictures were taken is about 3' from where it will live, but it is a decent spot for taking photographs.


Here are a few shots of the table in our house. Where the pictures were taken is about 3' from where it will live, but it is a decent spot for taking photographs.

James looking at the finished product. The oak top from Ikea sanded out, and finished well.

The top looks really thin in this photograph, but it is actually 1 1/2" thick.

A better view of the table in its now natural environment.

My oldest son Jonathan was talking to me about how to set up a chessboard. After all this is a game table.


An end view of the table.

Here is the first game of chess at the table. Hopefully there will be many more of these, and some checkers too. :)
As per the rules, here is the breakdown for materials I have in this table.
- Cherry Lumber $1.15 / bf. I messed up one board, so I probably used 10.5 bf in the base. So I have $12 in the base.
- The top from Ikea was originally $80 when I bought it for the bathroom vanity. The remnant I used was about half the original size so about $40.
- I used a little seal-a-cell on the cherry base. So $2 is sealer.
- I used general finishes Satin Arm-R-Seal Oil and Urethane all over the table. 3 coats on the bottom, 5 on the top. I figure about a cup or so. $7
- Sandpaper. $5
- Remnant of a walnut dowel. $1
- 8 brass screws, 8 steel screws, and 2 sacrificial metal brackets, and a little glue... $???
So my cost in materials for this table is around $66 - $70. Not bad for something that should last us a long time. Besides, the only thing I had to buy during this whole project was 220 grit sandpaper, cause I ran out. Other than that, all the materials were laying around the shop.
The final dimensions of the table are 28.5" tall, 26" wide, and 30.5" long. I bet I could make it fit into Neal's box. (Edit: after looking at the rules again. I am well withing the size limit. :))
Thanks to Rick for putting on the Sawdust Chronicles Challenge this year. It has been a lot of fun, and I picked up several new skills along the way. I also got a chance to use some of the tools that my wife has been buying me over the years.
Saturday, October 23, 2010
Sawdust Chronicles Challenge 2010 Part10 (I can see the finish)
I missed putting a lot of steps on this blog, but it has been a bit crazy here. (5 boys and all that) But today, I finished assembling the base of the table, drilled 2 holes in the base for guide pins, and 2 matching holes in the table top. Then I manufactured some clips to hold the top on, to allow for expansion and contraction.
We have had some L brackets lying around for years. Well, now we have 2 less.

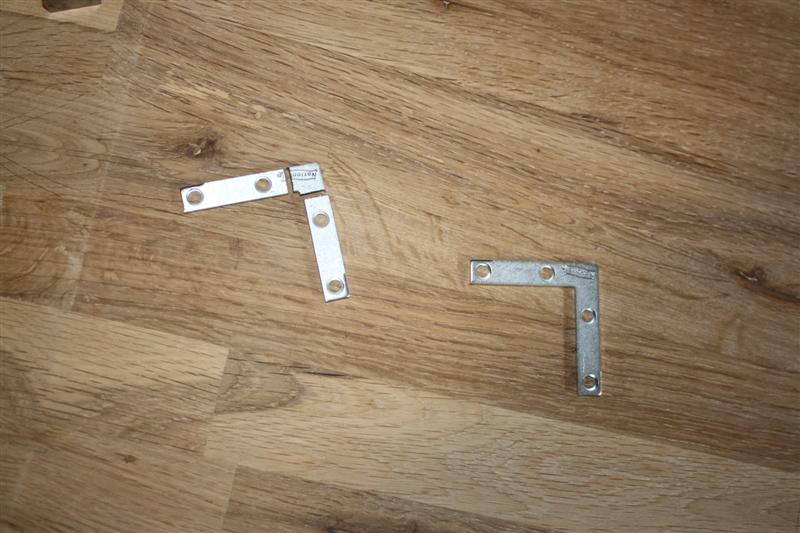
After I filed down the sharp edges, I made a notch for each, that would allow 30 degrees of movement or so. Probably way too much , but I rather do that, then see which is stronger. The Oak top, of the Cherry rails. Either way, I would lose.


Check out the cool joint that you will never see, unless you pull the top off the table.
That is a product of making the tenons like this.

To make the mortises, I drilled them out at the drill press, then finished them with chisel work. Not bad for something that won't see.

(Edit: Never mind. I looked at the rules again, and it allows up to 32". I am good to go. No bad news here.)
In 2-3 hours, I should be back out in the shop sanding down the seal-a-cell I put on the base, and starting the coats of poly.

One last thing. I had lots of help in the shop this morning. At one time 4 of the 5 boys were out there with me. James stayed out there most of the morning, sanding on a scrap of wood, and Joseph floated in and out.

James

James and Joseph testing out the strength of my vacuum hose.
Sunday, October 10, 2010
Sawdust Chronicles Challenge 2010 Part 9
Did some of the final shaping on the rails today, and then dry fit them to 2 of the legs. (I will do the other 2 tonight.) Overall, I feel that it was pretty productive time with the router, chair makers rasp, and sand paper.


To get the profile I wanted, I routed a 1/4" deep chamfer along the edges of the rails. Then using the rasp, I rounded them over and finished with sandpaper. It didn't take long, as cherry is easy to work.


Thursday, October 7, 2010
Sawdust Chronicles Challenge 2010 Part 8
Well the table is starting to take shape. I remade two of the rails over the last couple of nights. After doing the first set, I decided that they would not join to the legs in a solid enough fashion to stand up to constant use. So I did a quick redesign to incorporate through tenons into the table. There is still a lot of work to go on these parts, but you can get the general idea of how they will look once completed.


When all is said and done, it will look something like this.


When all is said and done, it will look something like this.

Sunday, October 3, 2010
Sawdust Chronicles Challenge 2010 Part 7.5 (Shop Update)
Yesterday I promised to post pictures. Well today I will post a couple about what I did. First thing in the morning I made 2 Nostepinnes. I told my wife that I would make 2 for every 1 that sold on Etsy. Well I am about 8 behind. So I made 2 yesterday. I think they turned out pretty well.
.JPG)
.JPG)


.JPG)
.JPG)
The first was made from some scrap Sapelle left over from the crib. The second is some purple heart that came from a wood pallet. I pulled a 30" x 2.5" x 2.5" piece of purple heart out of the dumpster. This example has some sapwood in it. If you look close you can see it at the small end and it runs half way down the handle.
The second part of my day, and the longest part, was cutting the bevels for the table top. The end bevels are 5" wide, and the bevels running the length are 4 " wide. Unfortunately I do not have a power tool to do this. So I did the starting cut on using the bench as a support, with a guide, and made the first cuts with a cicular saw. Then I broke out the handsaw, and sat down on the bench, and comenced to sawing. The cross cuts where rough, but the rips were easy.


I still have some clean up to do to get rid of the saw marks, and make the bevel a little straighter, but I think it will look really cool once it is sitting on it's base.
Saturday, October 2, 2010
Sawdust Chronicles Challenge 2010 Part 7
I spent the better part of the day today working on my entry into the Sawdust Chronicles Challenge. This morning, I worked a little on the legs, planing one side, and getting them ready to thickness. This afternoon was all about working on the top. Even though I am using the reminent from the bathroom cabinet, it was a lot of work.
All my initial cuts where with the skill saw, and because it will not cut deep enough, I finished with the hand saw. Then before dinner, I cleaned it up with the planes, and smoothed it. Funny thing about tops like this. When they put them together they really don't pay much attention to which way the grain is going. Which makes it a bit of a challenge.
I'll post pictures later.
All my initial cuts where with the skill saw, and because it will not cut deep enough, I finished with the hand saw. Then before dinner, I cleaned it up with the planes, and smoothed it. Funny thing about tops like this. When they put them together they really don't pay much attention to which way the grain is going. Which makes it a bit of a challenge.
I'll post pictures later.
Sunday, September 26, 2010
Sawdust Chronicles Challenge 2010 Part 6
My morning in just over 18 seconds. Most of the time was used cleaning up from the previous 3 projects. Towards the end, I jointed one side of the wood for the table, then took it to the table saw to cut it to width.
Saturday, September 25, 2010
Sawdust Chronicles Challenge 2010 Part 5 (Milling Lumber)
Of all the tasks that you must do as a wood worker, milling lumber has got to be one of my favorites. I enjoy taking a rough cut piece of wood, and watching the grain beneath reveal itself, as you joint and plane to wood. Today, I got to spend an hour or so milling the cherry for the game table I will be making. I fhave been working with Sapelle so long, that I have forgotten how good some woods smell.
Anyway, things went smoothly today, and I for one am glad I took the time to tough up my jointer knives before starting. I think next time, I will need to do the same for the planer.

Anyway, things went smoothly today, and I for one am glad I took the time to tough up my jointer knives before starting. I think next time, I will need to do the same for the planer.

Wednesday, September 22, 2010
Sawdust Chronicles Challenge 2010 Part 4 (Progress)
After doing the full size drawing, I went back and made a couple small changes to the design. Now that I am happy with the design, it is time to pick out a little wood. I plan to use cherry for this table. I have a small pile of #1 common cherry in my shop that I picked up for $1.15/bf back in January.

If you who have not delt with #1 Common and Better lumber, there will be flaws in the lumber. Splits/Knots on the ends will be counted in the total if there is clear lumber remaining that is 3" wide by 3’ long or 4" wide by 2’ long on either side of the split.
Here is a link about the virtues of #1 common:
http://americanwoodworker.com/userdocs/articles/200012/hww/main.html
Here are the 3 boards I will use for the table. Not all of this will be used, as I may have to cut around knots, artfully use sap wood, or trim off some bark. The good news is tomorrow, I will get a chance to mill some of this wood, and get a better idea of how it will look as a table.


If you who have not delt with #1 Common and Better lumber, there will be flaws in the lumber. Splits/Knots on the ends will be counted in the total if there is clear lumber remaining that is 3" wide by 3’ long or 4" wide by 2’ long on either side of the split.
Here is a link about the virtues of #1 common:
http://americanwoodworker.com/userdocs/articles/200012/hww/main.html
Here are the 3 boards I will use for the table. Not all of this will be used, as I may have to cut around knots, artfully use sap wood, or trim off some bark. The good news is tomorrow, I will get a chance to mill some of this wood, and get a better idea of how it will look as a table.

Now you may be thinking that this may not be enough wood for a table. Well, it will only be used for the frame and legs. For the top, I am planning to use a remainder from a previous project, but I will save that for another post.
Tuesday, September 14, 2010
Sawdust Chronicles Challenge 2010 Part 3 (Full scale drawing)
Printed out a full scale drawing of my table tonight, and taped it to the wall. With the margins on the paper, it gained an inch in height, and length. The height I like, the width well. An inch either way won't make any difference. Tonight I will go out and start picking out some wood, and hopefully start milling tomorrow.


Friday, September 10, 2010
Sawdust Chronicles Challenge 2010 Part 2
Today I recieved a copy of 500 Tables: Inspiring Interpretations of Function and Style (500 Series) by Ray Hemachandra. I really like books like this as they be a fairly broad perspective as to what makes a table, or for the purposed of this contest, what makes a platform. In it I found some works that are inspirational, and I will probably draw on as I finalize my design. Here are some of my favorits so far.
Jeremy J Cox. I really liked some of the ideas behind his work Formation, and Cadence.
Oliver Drake
William D. Bolstad
Wow, there are a lot of others... I think I will just sit down and flip through the book some more.
Jeremy J Cox. I really liked some of the ideas behind his work Formation, and Cadence.
Oliver Drake
William D. Bolstad
Wow, there are a lot of others... I think I will just sit down and flip through the book some more.
Friday, September 3, 2010
Sawdust Chronicles Challenge 2010 Part1
|
| Hard at work |
Well I signed up for the Sawdust Chronicles 2010 Challenge, that runs from Sept 1 to Oct 31. The object this year is to make a surface that fits in a 30" x 30" x 32" space. So after thinking about it a bit, I talked to the wife, and we decided that I should build a game table. "Great! So what do you want in a game table?" I ask.
"Well, I want some benches for it, that can be stored underneath it, and I want it to have a drawer."
So off I go, to design a game table with 2 benches, and a drawer that can fit in a 30" x 30" x 32" space. Well things were going great. Two days later, I have a nice table drawn up, and an idea for the benches. When I show it to her, she says. "Well it isn't quite right. I want to be able to sit under it more, and it still needs a drawer." It is at this time, I realize she is describing the table she is sitting at!
Here is what I presented to her.
Oh well, the game table is out. I think I have another idea, but it will take a few days to flesh out. In the meantime, here are some sketches I did earlier.

Here is a sketchup model from yesterday.

Subscribe to:
Posts (Atom)